Creating a VPN server has many advantages, especially in business situations where tight control over network resources is required. Once the server is set up, we now have the task of connecting a client to the VPN on Linux. In summary, in this post, you will learn how to connect an IPsec VPN client on Linux.
Introduction
We recently talked about what a VPN is and came to the conclusion that it is a virtual private network where enterprise resources such as web applications and even hardware resources are shared.
The advantages of a VPN are many and range from privacy and security to anonymity. In summary, you could highlight the following ones.
Remote working
With a VPN, it is possible to connect distant computers and therefore distant workers as if they were in the organization. In this way, by sharing resources, it is possible to take full advantage of them at home but work in the same way. In addition to this, it is safe to do so by establishing ideal security policies with VPNs.
Security of your data
Generally, most VPN connections are encrypted by default, so that the transmission of packets over the network is sent securely. This is especially important in open networks.
Censorship avoidance
With a VPN, you can circumvent blocking and censorship by government agencies. Especially useful in tyrannical governments and adverse situations.
In short, connecting to a VPN can be useful and solve problems in many areas.
What is a VPN client?
Simply put, a VPN client is software that is used to connect to a VPN server. This client has to be installed on the system, so how you do it will always depend on the system you are using.
Being a bit more technical, the client is used to looking for access through the VPN Gateway and establishing the connection. It will then build a secure tunnel to bring in user and corporate data using the VPN settings.
Generally, the use of a VPN client is transparent to the protocol used by the server, however, it is useful to know that within VPNs there are several such as:
– PPTP
– L2TP / IPsec
– OpenVPN
– SSTP
The essential thing to know is that clients are usually configured to use any of them, however, sometimes you need to install specific packages to perform the process properly.
- Install and use Outline VPN on Linux
- Install Riseup VPN for Linux Mint
- How to use tor as a proxy in Linux mint?
How do I set up a VPN client?
The procedure for setting up a VPN client will depend on the operating system you are using as well as the client you have chosen.
An example of this is that on Android we have one way to set it up, and on a Linux computer, we have another. Remember that a VPN client is really an application that allows you to connect to a server using login credentials.
In addition to this, it also depends on your VPN provider. In some cases, they themselves provide an application that allows you to configure it in a few clicks. Others only leave you with the possibility to do it using the native tools of the system.
So let’s go for it.
How do I enable IPsec on Linux?
This post assumes that you already have a working VPN server and that you have the necessary credentials to make the connection. They are:
Username – This username is assigned to you by the VPN administrator.
Password – This is a set of characters that identifies you along with the username. You have probably given the administrator the password, or it is generated automatically.
PSK – Pre-shared key that serves to authenticate the access tunnel from the server to the client and vice versa.
With these three things, we can start.
To enable the IPsec connection, we first have to install some packages needed to make the connection.
Regarding Debian, you can open a terminal and run this pair of commands
sudo apt update
network-manager-l2tp network-manager-l2tp-gnome
But if you are using Ubuntu, Linux Mint, and derivatives, we have to open a terminal from the client computer and run these commands to get recent versions of those packages.
sudo add-apt-repository ppa:nm-l2tp/network-manager-l2tp
sudo apt-get update
sudo apt-get install network-manager-l2tp network-manager-l2tp-gnome
If you are using distributions such as Rocky Linux, Alma Linux, or Fedora, you will need to run these commands
dnf install xl2tpd
dnf install NetworkManager-l2tp
dnf install NetworkManager-l2tp-gnome
Then, access the network options from the main menu or from the network icon.

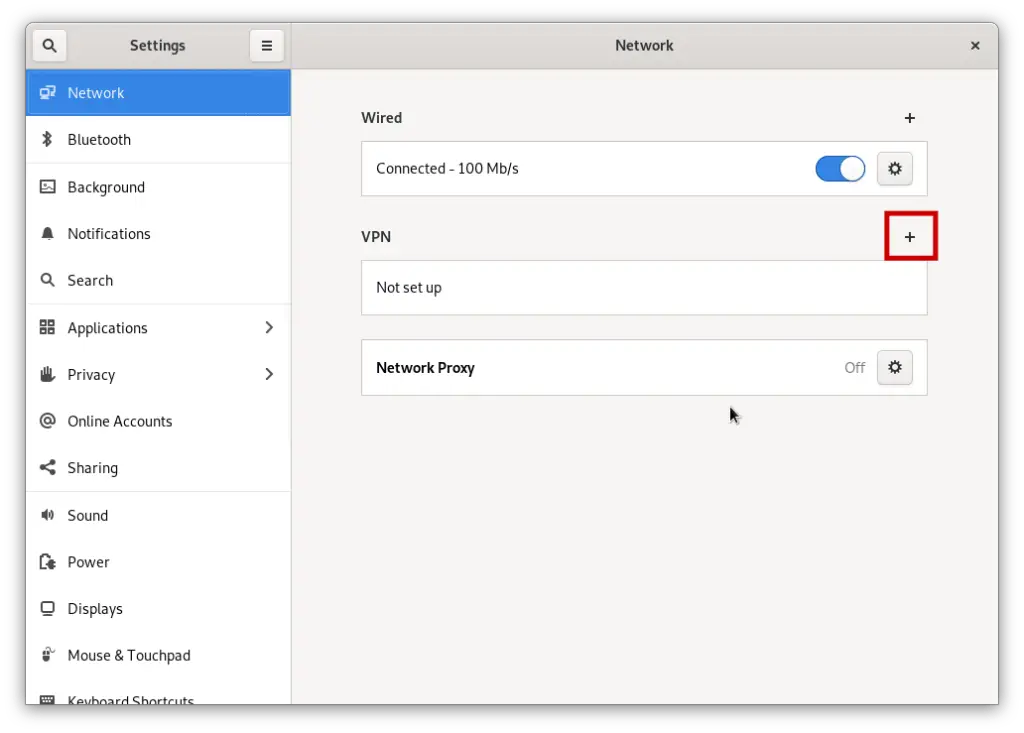
Now you have to add a new connection by clicking the `+` button.
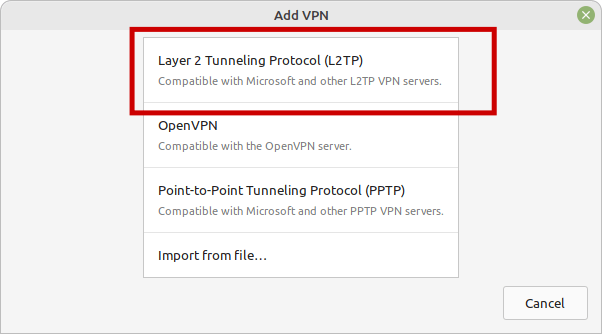
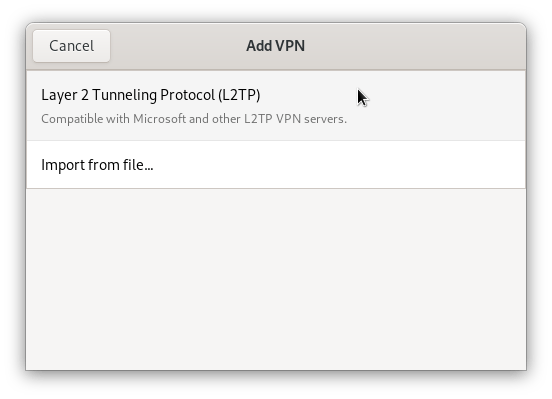
Then choose the option (L2TP) which in this case is the first one to appear.
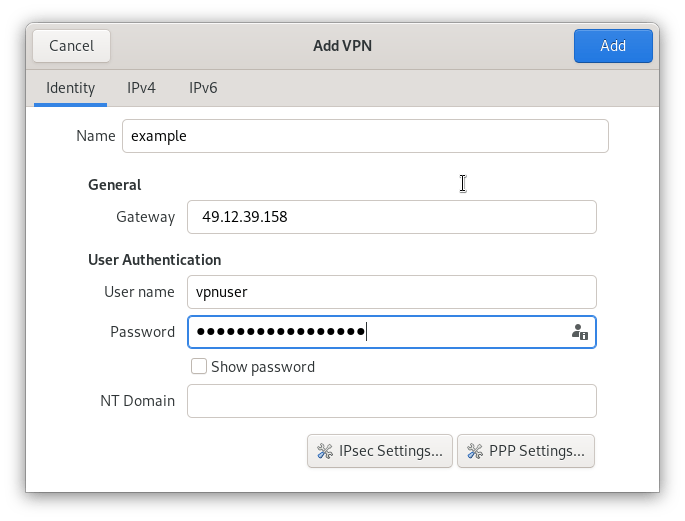
Now assign a name to the connection, in Gateway set the server address, and in Username and Password set the login credentials.
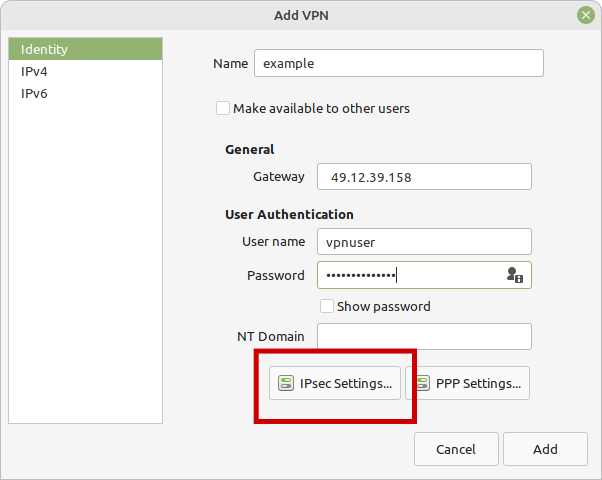
Before you finish, click on IPsec Settings
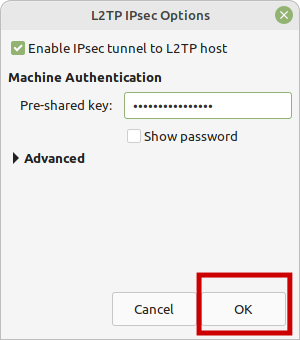
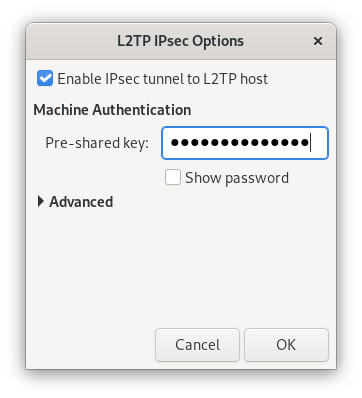
And inside it, enable IPsec Tunnel to L2TP Host and add the PSK of the server. Then, click on Ok.
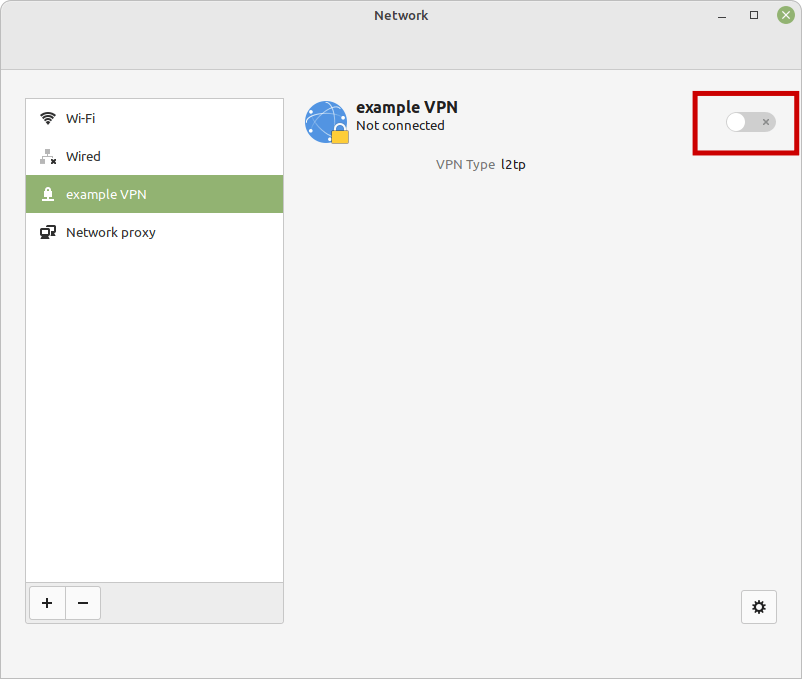
You should now see the connection. To activate it, just click on the activate button.
Enabling a VPN using GNOME
The process in GNOME is quite similar, open the network options from the main menu or from the general panel.
Add a new VPN by clicking the add button.
Then, choose the L2TP protocol
Set all the configuration parameters including name, username, and password. Then click on the IPsec Settings button.
Enable the IPsec tunnel to the L2TP host and add the PSK and click OK.
Accept all changes, and you should be able to use your VPN with GNOME.
Conclusion
Connecting to a VPN is a must before using it because a VPN works in a nutshell under a client-server architecture. This requires a server to be configured and ready, and then a client to connect to on the external computer.
These clients are distributed in the form of packages and in the case of Linux, we can integrate them with the connection tool in the main existing distributions.
During this post, we have shown you how to connect to a VPN from the desktop using two of the most popular desktop environments, such as Cinnamon and GNOME.
